GNU SCREEN: AN INDISPENSABLE TOOL FOR UNIX USERS Author Edvinas Šulcas
2017 01 09Author: Edvinas Šulcas
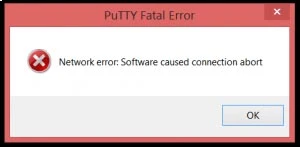
Imagine a situation: you are working on a remote terminal, you have launched a complex script that’s supposed to run for 4 hours and… After two hours you see this:

Or this:

Frustrated? If either of these seem familiar – read on. Screens might just be the solution to your problems.
WHAT IS A GNU SCREEN?
According to wikipedia GNU Screen is a terminal multiplexer. What does that mean? Well, in layman terms it’s a tool that allows a user to create a sort of “window” (or “screen”), that can be resumed even after a terminal session has been disconnected. One screen session can host multiple window-like sessions inside of it, which can used to organize your work.
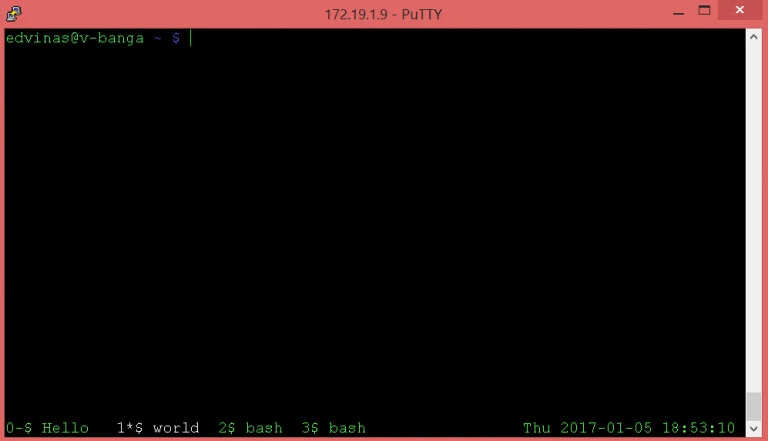
For example, here is how a configured screen might look like:

Take a note at the bottom of the bottom of the terminal. There are four “tabs” (1. Hello, 2. World, 3. bash, 4. bash) and on the right side the current timestamp is shown. I can quickly switch between these four tabs using a keyboard combination, similarly as I could switch between windows using alt+tab.
SCREEN BASICS
To install screen, you may use the standard package managers on your OS: yum, apt-get, pacman etc. Alternatively, find it on the official website: https://www.gnu.org/software/screen/
The most important commands to know when working with screens are:
screen -ls – shows a list of the current active screen sessions for the current user. So when I type it after logging in, I see something like this:
edvinas@v-banga ~ $ screen -ls
There are screens on:
18514.pasaulis (Attached)
4621.hello (Detached)
5275.world (Detached)
3 Sockets in /tmp/uscreens/S-edvinas.
So, in this case, there are three screens created for my user. “Hello” and “world” are detached, meaning I could “attach” them if I wanted to. “Pasaulis” is attached, which means I have it active on another terminal session.
screen -S [screen_name] – creates a screen session with a specified name and attaches it. So, for example, if I wrote “screen -S test”, I would immediately have a screen attached with the name “test”. Now you may launch whatever script or program you need and it will still be active even after the terminal session was disconnected. If you exit the session via the “exit” command, you will see “[screen is terminating]” and the screen session will be deleted. However, if you close the terminal or get forcefully disconnected, you may reattach your screen with the following command.
screen -r [screen_name] – reattaches a detached screen. -R can be used to force reattach a frozen screen.
screen -d [screen_name] – detaches a screen by name. This is sometimes necessary when a session crashes and needs to be manually detached. -D forces the detachment
CONFIGURING SCREEN FOR YOURSELF
You might notice that your screen looks a bit different than the examples in my screenshots. This is because I have my screen customized to suit my needs. This is done by changing the .screenrc file, which (depending on how you installed screen) can be found either in /usr/home/etc/screenrc or in your user home directory.
The following .screenrc example was provided to me by Mindaugas Gaurys and I have been using it almost daily ever since:
startup_message off
vbell off
defscrollback 5000
hardstatus alwayslastline
term linux
hardstatus string ‘%{= kG}%-Lw%{= kW}%50> %n*%f %t%{= kG}%+Lw%< %{= kG}%-=%D %Y-%m-%d %c:%s %1`%{-}’
The key point here is the hardstatus string configuration, which sets up a permanently visible line at the bottom of the terminal with a list of tabs and the current timestamp, as seen in the example screenshots. I will not go into too much detail about the configuration here, but there are plenty of cool and useful configurations around the web. Just google “screenrc” to find them.
COMMANDS INSIDE A SCREEN3
As mentioned before, the other benefit of using screen are the the tabs inside them. To manipulate said tabs, the following commands may be used:
- ctrl+a ctrl+d – detach screen session. This is the recommended way to end your terminal session to avoid any problems
- ctrl+a ctrl+c – create new tab
- ctrl+a shift+a – edit name of current tab
- ctrl+a [number] – jump to tab denoted by the number
- ctrl+a n – jump to the tab defined by the next number
- ctrl+a p – jump to the tab defined by the previous number
- ctrl+a ctrl+a – jump to last visited tab
You may notice that scrolling does not work correctly when using tabs inside a screen. Use the scrollback buffer to avoid these problems. To access it, use:
- ctrl+a [ – accesses the scrollback buffer. Navigate with up/down keys and “?” and “/” for searching. “Esc” exits scrollback mode.
Note, these combinations might seem a bit unusual at first. To clarify, they are used one after the other. So, for example, to detach a screen I would press ctrl+a, release the keys and then press ctrl+d.
FURTHER READING
Screen is a powerful tool and I have only scratched the surface in this blog post, if you want to learn more, further reading may be found here:
https://www.linode.com/docs/networking/ssh/using-gnu-screen-to-manage-persistent-terminal-sessions
Latest news
-

What We Wish We Knew When Starting Out as Developers
2025 06 13Discover key lessons for junior developers from real Progress OpenEdge Academy graduates. Learn how hands-on experience, teamwork, and mindset shape a successful dev career.
More -

ABLUnit Testing in VS Code with the ABLUnit Test Runner Extension
Gustas Mickus2025 06 12Discover how the ABLUnit Test Runner extension for Visual Studio Code simplifies unit testing for Progress OpenEdge ABL developers. Learn how to configure, run, and troubleshoot tests with ease while integrating Test-Driven Development into your workflow.
More -

Verification of Payee: A Key Step Toward Safer Instant Payments in Europe
2025 06 11Explore how SEPA and upcoming EU regulations make Verification of Payee (VoP) essential for secure, instant euro payments by October 2025.
More